When creating an API-heavy, network-oriented application, it’s inevitable that you have to deal with various forms of URLs. Since a multitude of query strings have to be created dynamically, it’s important to safeguard against potential errors.
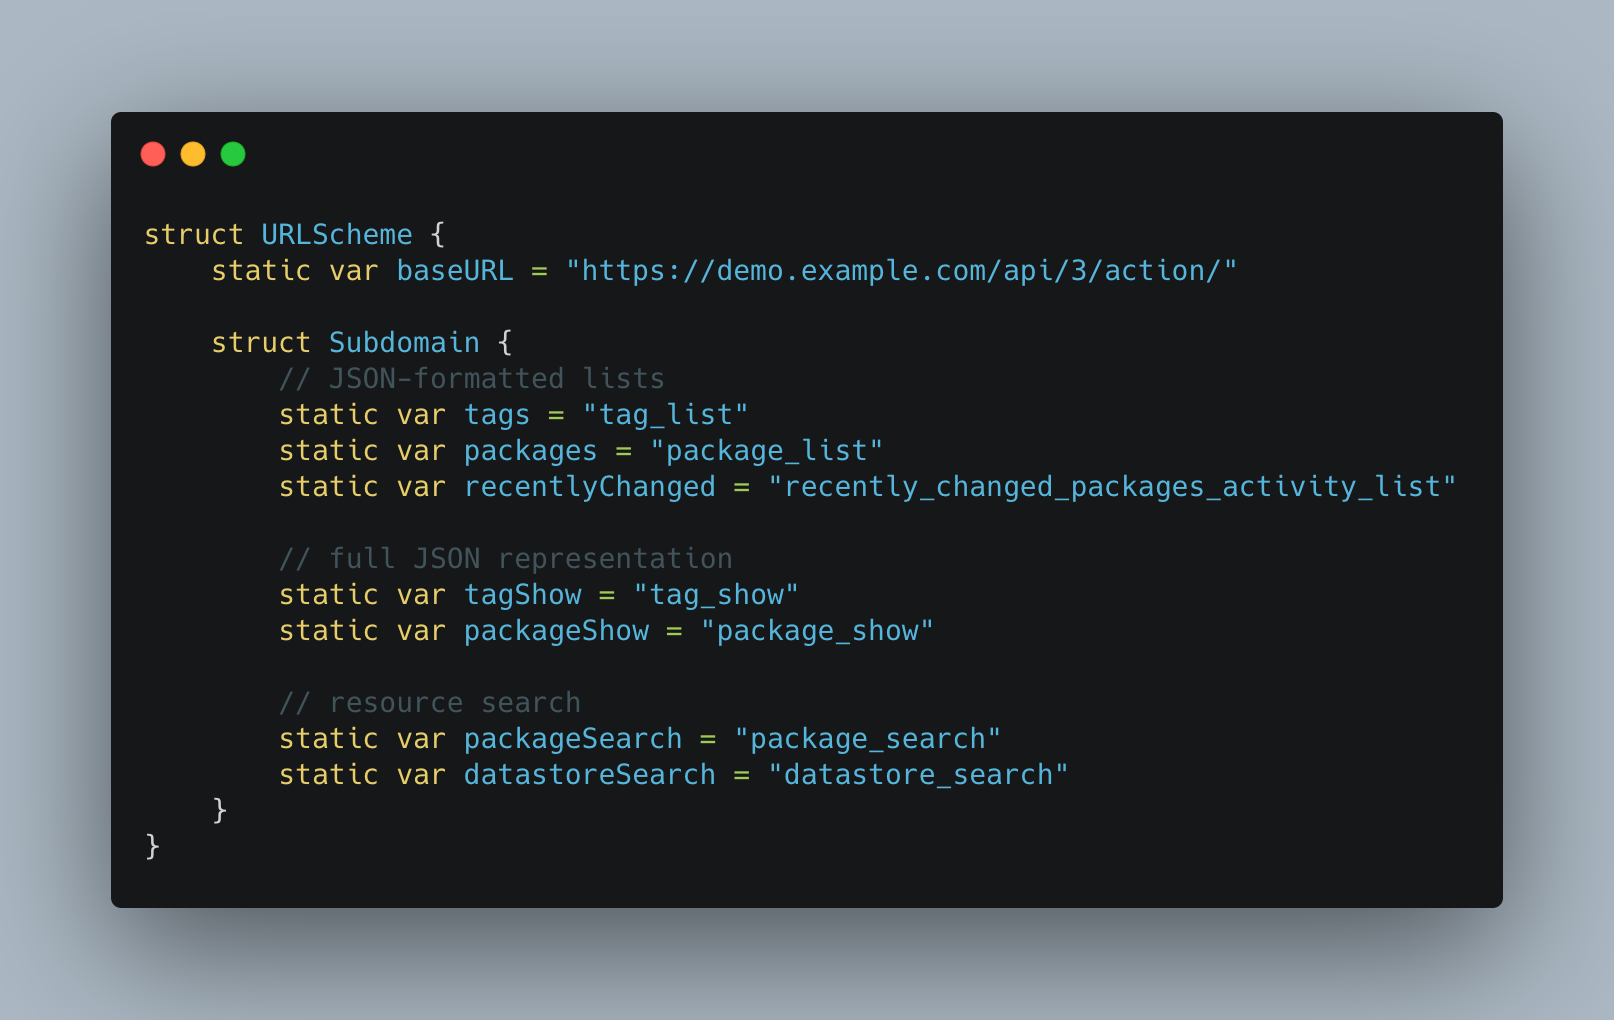
Let’s say the API endpoint we want to reach is at “www.example.com” whose searches are implemented by Apache Solr. If we want to get JSON-formatted lists of site’s datasets, the URL takes the following form:
http://demo.example.com/api/3/action/package_list
If you wanted the full JSON representation of the dataset, then it takes the following form:
As you can see from the non-typed nature of the URL strings, if we were to manually construct a URL every time it’s requested for, then you are opening your code base to a wide possibility of errors. One way of overcoming this problem is to divide up the URL into different sections and provide types for them.
First, we create a struct for URL schemes:
Second, you can compartmentalize the URL strings into an action type, query key , and the query filter. Now, there are many ways of structuring this, but let’s take a look at two ways I incorporate into my projects:
Above is the hierarchical structs with static properties which is similar in nature to the previous example. You will have to make the struct hashable if you intend on passing it as an argument to a function.
Another way of creating this organization is to use enum:
And, finally, we create a network manager to bring all of them together. Whether or not you use a singleton is up to a personal preference. Here I used enum instead for some creativity:
You now implement it as following:
There are pros and cons of using this method. The pros are that you can safeguard against potential spelling errors, you can enumerate the enum cases using allCase, and prevents confusion as to whether “fq” goes with “package_show” or “datastore_search”. The downside is that it’s not dynamic. You aren’t able to substitute a different action type for a certain URL.
One of the interesting aspects of Swift and UIKit is that there are multiple parallel trees that are intertwined and yet seem to operate independently. Here is a diagram that I created to illustrate 5 parallel trees that stem from just two UIViewControllers that ultimately lead up to UIWindow.
What I mean by operating independently is that even though the views belong to the view controllers, the superview and the child view have a direct relationship as if the view controllers don’t exist. Same goes for the superlayer and the sublayer. Even within a layer, even though the presentation layer belongs to the model layer, its properties are not to be modified and only to be accessed to obtain the current animation values, whereas you can freely access and modify the properties of the modal layer.
Understanding such independent characteristics helped me untangle the web of the hierarchies especially when they involve the sibling relationship. For example, let’s say a superview has a sublayer which, in turn, also has its own sublayer. If a subview that has its own tree of sublayers gets added to the superview, will the superview’s sublayer at the bottom of the hierarchy be displayed over the sublayers of the newly added subview if they are overlapped?
The answer becomes clearer if you take the views out of the equation and look at the hierarchy of the sublayers themselves. Since the subview’s sublayer gets added to the superview’s sublayer as its sublayer, it means the sublayer at the top of the subview’s sublayer hierarchy starts from one rung lower than that of the superview’s sublayer hierarchy. You compare the depth of the hierarchies as such and find the sublayer at the lower rung to be at the foremost in view.
Having the visual representation of the parallel trees also allowed me to understand the way Core Animation operates the layers. For example, you may see the presentation layer translate from point A to point B, you still have to translate nominally the model layer from point A to point B.
Life cycle methods are events sent by UIKit during the lifetime of a view controller. By looking at the order in which they are called, we can take a peek at what is happening behind the scene.
This is pretty much what would expect to naturally happen as a view controller gets instantiated. The init would have to occur first since it’s the very thing we’re instantiating and then loadView happens right after which is to instantiate the main view and add it to the view property of the view controller. But, why does viewDidLoad have to happen before viewWillAppear? It will become clearer in the following examples. Let’s take a look at another case:
let viewController = ViewController()
let navController = UINavigationController(rootViewController: viewController)
Instead of having the subclass of the regular UIViewController as the root view controller, we’re going to add it to the subclass of UINavigationController as a child view controller. The result is as follows:
The pre-existing order remains the same except willMove, updateViewConstraints and didMove have been inserted. There are a few notable things to look at here. First, willMove happens prior to viewWillAppear, but after viewDidLoad. willMove is a method notifies the parent view controller that the child view controller is about to be added. It’s something that UIKit calls for us so that we don’t have to call ourselves and it can happen multiple times during its lifetime where as the initializer will only happen once. But, why?
When a view controller adds a child view controller, there are two parallel hierarchies: the view controller hierarchy and the view hierarchy. The view controller hierarchy starts from the innermost child all the way up to the root view controller which is a property of the instance of UIWindow. The hierarchy of the main views is aligned the same way as their view controllers all the way up to the main view of the root view controller, which is the view property of that view controller.
Now, when a child view controller is added to the parent view controller for the first time, the view of the child view controller gets loaded into memory first and then gets added to the hierarchy of the main views second. This is what can be seen above: viewDidLoad message is sent when the main view is first loaded into memory and viewWillAppear is sent when the view is about to be added to the view hierarchy. Therefore, viewDidLoad is only ever called once whereas viewWillAppear will be called whenever the view is added to the hierarchy.
The final notable point is the layout-related methods. viewWillLayoutSubviews and viewDidLayoutSubviews messages are sent after viewDidLoad, but before viewDidAppear. The implication is that the layout of the subviews actually happen after the main view has been loaded. Many of us have made a mistake of trying to resize or relocate an object with respect to the bounds of the main view within viewDidLoad only to realize that it’s not working. For example:
The above code won’t execute the way it’s intending because self.view.bounds.midY is going to be 0. The reason is that the layout has not been carried out yet. By placing the code within the aforementioned layout methods instead, you can overcome this problem. It’s important to know that, unlike viewDidLoad, the layout methods could be called a multiple times, which means the instantiation of the objects should not be performed within them.
It gets even more interesting when you override the lifecycle methods of the parent view controller:
This is an interesting result because the portion about the view of the child view controller being added to the view hierarchy is missing, namely viewWillAppear, viewDidAppear, and the layout methods. This is because only the built-in view controllers like UINavigationController and UITabBarController automatically add the view of the child view controller to its main view. As soon as the we create a custom parent view controller, it is our own responsibility to add the main view ourselves.
The parent and the child view controllers go through a back-and-forth dance until the parent view controller adds its main view to the view hierarchy first and then the main view of the child view controller gets added last.
Let’s go back to the previous example of UINavigationController. Let’s say we add a second view controller that we can navigate to that precisely mirrors the first view controller:
A few notable points here as well: first, the main view of the first view controller gets removed from the view hierarchy as soon as the main view of the second view controller gets loaded onto memory. Second is that the updateViewConstraints and traitCollectionDidChange don’t get called for reasons unknown. And, finally, the first view controller is not de-initialized. The last point is interesting because, unlike UIPageViewController which instantiates a new view controller every time you add a child view controller to its parent, UINavigationController as well as UITabBarController retains the reference to the previous view controller even if it’s not visible. In fact, if you were to check out the debug view hierarchy of UINavigationController, you’ll see this:
I once asked a UX/UI designer if it helps to be able to draw and sketch well to do what they do and the reply was that it certainly wouldn’t hurt, but the foundation of what they do is layouts and margins.
Swift has intricate ways of performing layouts including the manual way through layoutSubviews, Autoresizing, and Autolayout. They operate within the confinement of default margins or the custom margins you set. By mastering how to work with layouts and margins, you can create a strong base for your user interface.
Safe Area
Safe area is a property of UIView, but something that’s contingent on a UIViewController. Safe area refers to the top bar area where the status bar is or the bottom bar where the navigation bar, tab bar, or the tool bar is. Using the safe area, you can prevent your content from being covered by these bars. When the height of these bars change due to the change in the device orientation, the safe area automatically changes accordingly, allowing the views within your view controller to be adaptive as well.
A cool thing about the safe area is that it gets propagated down the view hierarchy. If there is view controller containment, the safe area gets propagated down the view controller hierarchy as well. This is intentionally designed in such a way so that all the subviews and the child view controllers are also prevented from being covered by the bars. In other words, all views have the safe area even though the root view controller only interacts with the main view regarding the safe area.
One of various ways of accessing the safe area is following:
It’s important to note that safeAreaInsets is read-only.
additionalSafeAreaInsets
One might ask, if the safe area is automatically set for you dynamically and propagated down the view hierarchy, do I need to do anything more than just read it? It so happens that you can actually set it as well.
While the safe area is from the main view and the root controller, margin belongs to the individual view. It’s not difficult to imagine that the margins can be customized.
You can read it using layoutMarginsGuide:
let constraint = yourView.trailingAnchor.constraint(equalTo: self.view.layoutMarginsGuide.trailingAnchor)
The default margin is 6 points. layoutMarginsGuide is read-only so you can set it with layoutGuides using UIEdgeInsets:
iOS11 introduced NSDirectionalEdgeInsets which accommodates the languages that read from right to left and reverses the insets of your interface accordingly. This is similar to using “leadingAnchor” instead of “leftAnchor”:
Wait a minute, if the safe area is propagated to all views and each view has its own margin, does that mean each view has both the safe area as well as the margin? That is correct. Each view’s own margins are insets from the safe area by default. If a view is situated close to the safe area and has a value of 30 and you set the margin to 10, the total margin you see on the view equates to 40. If the view doesn’t overlap with the safe area, then the safe area becomes 0 and is only left with its own margins. You can eliminate the safe area altogether and only work with the margins by setting “insetsLayoutMarginsFromSafeArea” property to false.
What I find to be confusing is that some margins are expressed with edge insets, which are numeric values, and some in layout guides, which are for Autolayouts. On top of that, some properties are read-only and some get be set.
I created the following charts to summarize the attributes with use cases:
NSDirectionalEdgeInsets and UIEdgeInsets can be used interchangeably to set the margins as long as the properties directed towards are directionalLayoutMargins and layoutMargins, respectively.
One last important thing to note is that margins aren’t substitutes for the constraints of your views. If you find yourself being dumbfounded by the fact that none of your elements are being responsive to any of your margins and safe areas, that’s because the constraints are missing. So always remember that margins and constraints go together.
I once took a biology course that explained how the food you consume becomes part of what makes you who you are through a multistep process of converting macromolecules into simple molecules. It gave me a deeper understanding of what a simple act of eating entails and an appreciation for cooking and health in general.
In a similar fashion, the process in which the raw code you write gets converted into the polished user interface that you see as an app is a multistep process worth looking into. It will provide you with a deeper insight into how to write code, configure it, and build it.
1.Template
It all starts with your designated IDE, which is Xcode. You usually start by creating a new project from a template:
What is a template? Template is just a pre-written file residing within Xcode. You can access them by going to the following address:
You will see all the templates presented in Xcode’s interface above there.
If you often use a certain type of an app architecture like MVVM that’s not one of the default templates, you can create a custom template, which will show up under the “Custom Templates” section from the Xcode interface. When you select one of these templates, Xcode simply duplicates the template and inserts the name you created into various places.
2.Build Phases
Once you create your template, you’re given a set of files looking something like this in the Project Navigator:
This corresponds to the contents of the project folder that Xcode created for you at a place of your choice:
Now, you are off to writing your own code and the sky is the limit! You’ll often notice that the structure of the files shown in the Project Navigator of Xcode looks different from the contents of the project folder, especially when it comes to the folder structure. Xcode calls a folder a “group” and there are two kinds: a folder-linked group and a regular group. When you create a folder-linked group in the Project Navigator, Xcode will also create a corresponding folder within the project folder. The group without a folder will show the folders within the Project Navigator, but not in the project folder. These are mostly for a organizational purpose and you can refer to the files within the folders the same way in both cases, but doesn’t effect the way your app gets build.
Now that you’ve written your code, it’s time to build it. Building process has a few phases:
What you are building is not the entirety of your project, but rather a target. A target is defined as following:
A target specifies a product to build and contains the instructions for building the product from a set of files in a project or workspace. A target defines a single product; it organizes the inputs into the build system—the source files and instructions for processing those source files—required to build that product. Projects can contain one or more targets, each of which produces one product.
Therefore, your single app can have multiple targets and each target can have different build settings. When you build, Xcode goes through the build phases, such as Dependencies, Compile Sources, etc, within a target one-by-one until completion.
Prior to Xcode 10, Xcode would go through each target (if you had multiple targets) one after another. Starting Xcode 10, Xcode makes more efficient use of the hardware and builds multiple targets at the same time. The parallelized build setting is enabled by default:
Let’s go through the build phases one-by-one.
“Dependencies” you see at the top of the Build Phases are the dynamic frameworks that has all of its resources in itself, sort of like a mini app within an app. Each include the executable file, resource files, info.plist, and supporting files. These actually have to be copied into the destination bundle.
“Compile Sources” are the the target’s .swift files.
“Link binary With Libraries” are for linking static libraries that only need compiling and linking and not being copied into the destination bundle. The default build settings of the Xcode enables the module support and auto-linking these modules that you have imported using the “import” command so you don’t have to worry. However, depending on the libraries, you would sometimes see them fail to be linked automatically so I make it a habit to link manually any libraries that I use. You simply click the plus button in the corner to add additional libraries.
“Copy Bundle Resources” are the Asset catalogs, storyboards and xibs, localized strings, and custom resources files.
3.Build Settings
Build Settings have briefly been mentioned above with the module support, but they are exactly that. If Build Phases are specifying the order in which different tasks are chunked into being built, Build Settings are to specify how they are built. More specifically, it structs things like how you want the compiler to behave as it builds the project.
Let’s say you create a Build Settings A and Build Settings B that you want to toggle back and forth. These sets of Build Settings are called Configuration. By default, you are given two configurations: Release and Debug.
Debug is when you’re in the process of developing your app and want the compiler to display all the debugging information. Release is when you publish your app and goes into the production mode and you want the compiler to optimize your code. You can definitely create additional customized configurations.
Now you have multiple configurations and multiple targets, but which one goes with which? That’s when “scheme” comes into play:
You get to mix and match with target(s) get built with which configuration. The default project comes autocreated with a single scheme named after your project, as you can see above as “YourApp”.
4.App Bundle
What is the result of building the project folder? It’s an app bundle. App bundle is literally a file with a .bundle extension. There is the aspect of signing your app that I haven’t gone over, but this is essentially the core of your app and what you submit to the App Store.
The project folder you initially created from a template in Xcode has been converted to what you see above. You can see “Info.plist” which is a collection of key-value pair text file that includes information like what the name of the executive file is or permissions, etc. “YourApp” is the binary file that had been compiled from .swift files. The “Base.lproj” folder containts the “.storyboardc” which are a collection of nib files compiled into one. If you create an individual xib file, it will show up as a single nib file in this bundle.
5.Launch
Now that we have the app, let’s launch it! When iOS launches the app, it looks for the entry point file “main.swift”, which is the only file that can contain top-level code. What I mean by that is, usually the executable code can only reside in between the enclosing curly brackets, like a function:
If you were to try to execute “bar()” at a top level outside of any namespace, it will fail. The only exception is the function within “main.swift”, which happens to be “UIApplicationMain”. It looks something like this:
This function executes a series of tasks:
Instantiates UIApplication.
Instantiates the app delegate marked with @Main.
Calls the function application(_:didFinishLaunchingWithOptions:) from the app delegate.
Instantiates SceneDelegate and creates a UISceneSession and a UIWindowScene.
Instantiates the storyboard’s initial view controller.
Instantiates UIWindow and sets the scene delegate’s window property to the newly instantiated UIWindow.
Sets the instance of window’s “rootViewController” property to the initial view controller.
Calls the “makeKeyAndVisible” method from the window.
Calls the scene(_:willConnectTo:options:) method from the scene delegate.
Now this is under the assumption that you are using iOS13 and after and the Info.plist specifies that the initial scene uses a storyboard, If all goes well, your iOS should have loaded your app and be displaying whatever you have on the root view controller.
And there you have it, folks! This article articulates the lifecycle of an app from the inception to the launch. Portraying a software process is like looking at an object with a super telephoto zoom lens; you have the power to zoom in as much as possible, but also have the power to zoom out. You can dissect a software process all the way down to the machine language of 1’s and 0’s or as abstract as you want, but, ideally, you want to find the sweet spot somewhere in between. Hopefully I was able to achieve that to a certain extent.
I once read that an Amazonian tribe named Amondawa uses a language that lacks the idea of time. It’s reflective of the fact that a language tries its best to mirror its surroundings, its own real world. And a programming language is no exception.
An Object Oriented Programming language tries to reflect the real world through objects. What is an object? In order to understand what an object is, we have to delve first into what a class is. A class is a logical grouping of properties and methods to reflect an abstract concept, not unlike the Form from Theory of forms by Plato.
Class
Think back to the first time you saw a horse as a kid. It has four lanky legs, an elongated muzzle, flowing black mane from its crest, chestnut-coloured body, and poses a formidable size. That’s your idea of a horse. Time goes by and you witness a similar-looking beast, except it possesses a dark brown mane, dapple grey body, and an even bigger body. Your idea of what a horse is has been disrupted. Perhaps a horse doesn’t have to be chestnut-coloured and with a black mane. They just have to have an elongated muzzle, sizeable and run on four legs. Later in your life, you witness another horse, but born with one of its leg is missing. Oddly enough, you don’t think of it as another species of animal, but a horse with a leg missing. And you wonder, at what point does the animal stop being a horse? What if all four of its legs are missing? What if it has two heads? What makes a horse a horse?
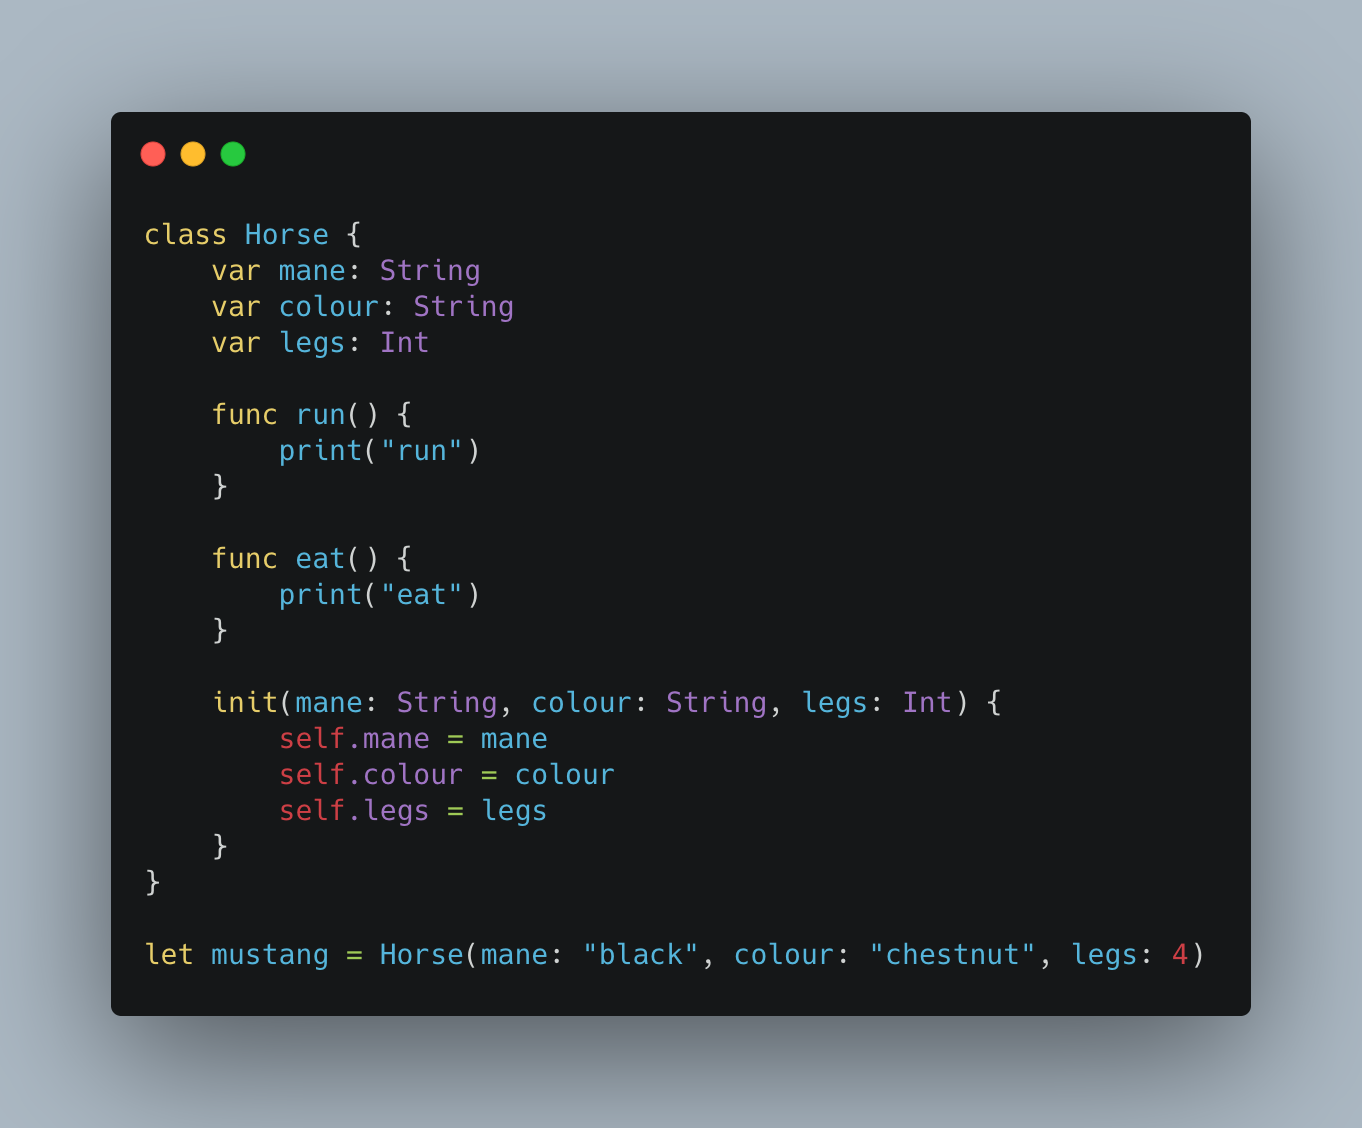
That very abstract concept of “something” is essentially a class. It possesses properties to reflect its attributes and methods to reflect what it does.
A property is a top-level variable like “mane”, “colour”, and “legs” and a method is a function that resides within a class namespace like “run()” or “eat()”.
A class can create an instance through an action called “instantiation”. An instance of a class is the realization of this abstract idea into a specific idea, otherwise known as an object.
That first horse you saw as a kid is an instance named mustang of a Horse class. It’s an elegant way to reflect the world we see around us (I will mostly be talking about a reference type initializer in this article).
Initializer
What is the magical process that actualizes the abstract idea into something real? It’s through initializers. An initializer is a special type of function without the “func” notation and one that can’t return anything, but otherwise behaves the same way as an ordinary function. Its sole purpose of being is to instantiate a class into an instance.
What is a prerequisite for a class to be instantiated? It’s as simple as having all the non-optional properties be initialized. In other words, no non-optional properties can be nil, including the properties of all the super classes up the inheritance chain as well as the constants. The compiler will warn you of the fact, if you choose to forgo it. Optional property types are automatically initialized with nil. This safeguarding by Swift’s compiler seems like a trivial thing, but many of the Objective-C’s mysterious errors derive from the lack of this enforcement.
Why is it important to initialize all the properties? Let’s take a quick look at what a compiler does during the process of instantiation. When a message is sent to an initializer of a class, memory for the instance of this class is allocated, but not initialized. Only when the initializer confirms that all the stored properties within this class, as well as those of the superclass, have been assigned a value, the memory for the instance gets fully initialized and “self” is created.
There are three ways for this prerequisite to be fulfilled.
1. Designated Initializer
First is through the designated initializer as shown above. Designated initializer is the primary initializer that initializes all the properties within the class and that of the super class if it exists.
2. Default Values
Second is through default values. Let’s say a default horse in your world is the very first horse you saw in your life, unless otherwise explicitly specified.
Now, there are two ways to use default values. First is to have the individual properties have their default values at the time of declaration.
Notice how Horse() doesn’t have any arguments as the first example. This is because it’s using the implicit initializer “init() {}” since all the properties have already been initialized. An implicit initializer is a function that’s hidden, but is available for us to use.
Second way of using the default value is with the parameters of the initializer. Remember that an initializer behaves just like a regular function? A parameter of a function can have a default value.
The advantage of having default values is that you only have to initialize the properties that are different from the default values. For example, if you want an instance of a horse that’s just like mustang you saw, except with a brown mane, you only have to initialize the mane property:
3. Convenience Initializer
The third and the final way to initialize a class is through a convenience initializer. Technically speaking, a convenience initializer doesn’t actually initialize a class, but only supports the designated initializer by delegating to one.
As you can see, calling a convenience initializer, in turn, calls the designated initializer to complete the instantiation. In the process, the convenience initializer takes in a single parameter out of 3 it can take.
When would you use a convenience initializer? I would like to think of it as the best of the both worlds between having no default values and having default values. As soon as you assign default values to a class’s properties, you forgo the ability to enforce the users (whether it be an actual person or your app) to deliberately initialize the properties with their own values. In other words, some of the properties can be left out of the initializing process. This is perfectly useful when there is a baseline or re-occurring properties to which most instances would adhere, but not so useful when you want to require a class to sometimes be initialized with all new values.
On the other hand, if you have no default values, you’re requiring all of the properties be initialized every time a class needs to be instantiated, which could sometimes be redundant.
In order to accommodate both of these needs in a flexible manner, you can introduce a convenience initializer. As you can see in the example code, you have the choice to require all of the properties be initialized or only a particular property. The important thing to remember is that all convenience initializers have to ultimately call a designated initializer.
You might wonder, can’t a designated initializer delegate another designated initializer?
The answer is yes. What, then, is the point of a convenience initializer? If you take a look at the top of this example code, you might notice that the type is a structure, not a class. In a value type, you don’t have to mark a delegating initializer with “convenience”. As a matter of fact, you’ll be met with a warning “Delegating initializers in structs are not marked with ‘convenience'”, if you do.
Some might look at Michael Jackson doing the moonwalk and say “he’s just walking backwards”, but there is a level of art in what he does. In Swift, passing values forward to the next screen is pretty simple, but when it comes to passing values backward to the previous screen or to the parent view controller, you have to do a little moonwalk. Definitely nailed that analogy.
Passing values forward to the next screen is commonplace. You select an Airbnb listing from a catalogue of listings and you be taken to the detail screen showing the price, availabilities, location and the amenities. The unique identifier of the listing, or the entirety of the detail information, is passed to the detail screen so that the detail screen could fetch new information regarding that specific listing.
Passing values from a parent view controller to a child view controller is also very commonsensical. You see the tab bar at the bottom of the AirBnB app showing all the children screens like Account, Listing, Post, etc.
But, what about passing values backwards or upstream? How do you pass values from a listing detail back to the main screen or from one of the child view controllers back to the tab bar navigation controller?
Before I learned to implement the containment of child view controllers within its parent view controller, my view controllers would go over thousands of lines of code. The form entry screen of this very app is currently sitting at 1300 lines and growing. While this isn’t a big number compared to millions of lines big companies have, it all comes down to how much of it could be more efficiently re-organized. As it happens, the majority of the form entry screen’s code comes from adding and removing individual subviews to the view controller.
Let’s take a little detour to ask ourselves a question. What is view controller containment? It’s a type of hierarchical architecture in Swift that’s define succinctly here:
Container view controllers are a way to combine the content from multiple view controllers into a single user interface. Container view controllers are most often used to facilitate navigation and to create new user interface types based on existing content. Examples of container view controllers in UIKit include UINavigationController, UITabBarController, and UISplitViewController, all of which facilitate navigation between different parts of your user interface.
The structure of a container view controller can be the typical parent-to-child relationship as the examples stated in the quote above or can be a master-detail relationship which can be seen on your mail app or Twitter app if you orient your device in a landscape mode. The mail header is shown on the left column and the detail of the mail is shown on the right column, each taking up a real estate within a view controller at the same time.
I decided to use a container view controller for a Profile screen which has one child view controller for saving your profile like the username and the bio and another child view controller which shows you the resultant information after the submission. The parent view controller decides which child view controller to be shown by fetching the profile information and verifying if it exists or not in the database.
The initial user interaction would like be this. Upon the arrival at the profile screen by the user, the parent view controller would check the existence of the profile and if it doesn’t exists, it will instantiate the child view controllers with a form. Once the user fills out the form and submits it, the parent recognizes that the profile now exists, removes the form view controller, and instantiates the profile information view controller.
Now, this is where I ran into a bit of a hurdle. When the user submits the profile, the information has to go to its parent a view controller. How should be accomplish this? I resorted to the trusty protocol/delegate way.
First, I created a protocol:
Second, I created a container view in the parent controller and equipped it with the protocol:
Third, I created a segue named “childToParentSegue” in the Interface Builder and added the following method to the parent view controller that passes the parent view controller as a delegate to the child view controller:
Finally, I created a method in the child view controller to use the delegate to be able to pass the value:
Looks all nice and dandy, except there was a slight problem. It didn’t work. The value wasn’t getting passed. As a matter of fact, the delegate was not getting passed and it remained as nil. But, if you look at the third step, I was clearly passing the self as a delegate so what was the problem?
The problem was actually exactly that: I was passing the delegate through the segue. I was adding the view controller as following:
And removing it as following:
In other words, I was adding and removing the child view controller programmatically and trying to pass the delegate through the segue in Interface Builder. It would have to be either one or the other.
I got rid of the segue and implemented the delegate at a place where I instantiated the child view controller:
And voila! The intended value was passed to the parent view controller and it toggled to the desired child view controller. There was no messiness of adding and removing individual elements from the same view controller and it was also easier to troubleshoot with three different compartmentalized view controllers.
The Occam’s Razor principle states that the simpler explanation of the two that account for all the facts is more likely to be the correct one. Just like Jeffrey Epstein’s death would be simpler to be explained by conjecturing that it was a murder by the fellow prison mates the way prisoners of Epstein’s background get murdered in prison than an orchestration of some supranational, shadowy, puppeteering organization, similar principle applies to programming as well.
I wanted to have an interface in my app that allows the user to click on a button that brings up the image picker and upon selecting the image, it gets set on the button itself. In other words, the initial button will take on the image so that the image is now a clickable button. I didn’t want the image just to be an image view because I wanted the user to be able to click on the image should they want to bring up the image picker again and choose another image instead. Simple enough, right?
The complication started with two factors. First, due to the fact that I had numerous custom buttons, I factored out the button creation function so that it was reusable for all custom creations. Second is more due to my lack of understanding, but the fact that the button was nested inside the stack view and loaded in viewDidLoad().
First, I created the aforementioned function for creating custom functions:
I, then, initialized all the buttons in the viewDidLoad() function:
So far so good. When the user picks an image from the image picker, I had it pass the image to a tentative variable called currentImage, which was then used to create a new button called imageButton:
The problem was that when I tried to add the newly created imageButton to the stack view, no changes were happening to the view controller:
This was understandable since the addition of the elements to the stack view was occurring in the viewDidLoad() function, which means by the time the image is added to the imageButton, the view controller had already been loaded.
I needed a way for the button to have a default customization when the view controller first loads and then be set with new attributes when needed. So I tried creating a separate structure that could hold the default values and also have a function that could call to set new values.
I chose structure instead of class because it’s less expensive and I don’t need any inheritance. The idea was to set a new instance of a button with the newly selected image, but also maintain the modularity of the custom button creation for all the other buttons.
The structure uses the default values to create the initial button in the viewDidLoad() method and then instantiate a new button in the didFinishPickingMediaWithInfo method which is assigned to the existing button property.
One thing to note is the delegate property inside the ButtonCreator struct. It allows the view controller to assign itself to be the delegate for the struct so that the struct could invoke certain methods within the view controller, namely #selector(delegate?.buttonPressed) in this case.
I was just proud of the implementation of the delegate since it was only not long ago that I was struggling to understand the usage of delegates and protocols. It’s one thing to learn the use cases of a delegate from a predefined function in UIKit, but it’s another to write your own code that capitalizes on the architecture.
Having said that, the above code still didn’t work. The initial button was loading up properly with the default attributes, but the instance was a button wasn’t being assigned to the cameraButton property.
I scrapped the ButtonCreator struct (so long my delegate) and reverted back to having the createButton function in the main view controller.
In the end, I lazy loaded the button in the beginning with the createButton function and set the newly picked image directly to the createButton properly. There was no need to create a new instance of a button nor had anything to do with the stack view. I simply needed to use the very same createButton property and set the newly picked image, cameraButton.setImage(image, for: .normal). All of the other attributes of the button that I used to create it in the beginning, like the target and the tag, are still the same and only the image is changed.
The Law of the Instrument has a saying that “give a small boy a hammer and he will find that everything he encounters needs a pounding,” or something to that extent. As of learning the performance benefit of lazy properties (illustrated in Part 3 of this series), I’ve gone ahead and converted pretty much all of the properties to be lazy. If I can delay having to initialize properties until absolutely necessary, whether or not they take a nontrivial amount of time or computationally expensive, what would be the harm?
I have these properties that get initialized right away upon loading of the view controller. The constraints regarding these properties are executed in the viewDidLoad() function, essentially making this a two-part process.
These have been converted to taken on the form of a lazy property:
They look more verbose only because the constraints are integrated into the initialization, making the process a one-part ordeal. Therefore, verbosity isn’t actually a factor to consider in this comparison for fairness.
What are, then, the factors to consider? Are there costs to using lazy properties? As with anything, if something is too good to be true, it usually is.
These are some of the disadvantages of using a lazy property:
Not thread safe. The Swift documentation states that “[i]f a property marked with the lazy modifier is accessed by multiple threads simultaneously and the property has not yet been initialized, there’s no guarantee that the property will be initialized only once.” Static properties, however, are thread-safe and also lazy.
The lazy modifier is a syntactic sugar, which means, even though it may seem like we’re only adding a single word to a property, what compiler gets to look at is a completely different story. If you compare the amount of Swift Intermediate Language (SIL) code for a non-lazy property and a lazy property, a lazy property takes up a far more amount of data. This results in an increased size of your app.
If you calculate the speed of computation as the amount of tasks performed over time, the delay in the lazy property being initialized adds to the total time, even though the amount of time it takes for the initialization might be the same as a non-lazy property. The actual benchmark for this claim is debatable, however. On the flip side, pre-fetching or caching reduces the amount of computational time.
Lazy properties are re-calculated every time you access them, resulting in a waste of resources.
I’ve gone ahead and reverted most of the properties back to the non-lazy type except for the one that loads the plist from disk, which is computationally taxing, and ones that depend on the initialization of an external property:
The above date label requires the “progress” property to be initialized prior to initializing itself, which, otherwise, risks the optional value to be nil.